- Posted on
- • Paint Mixing
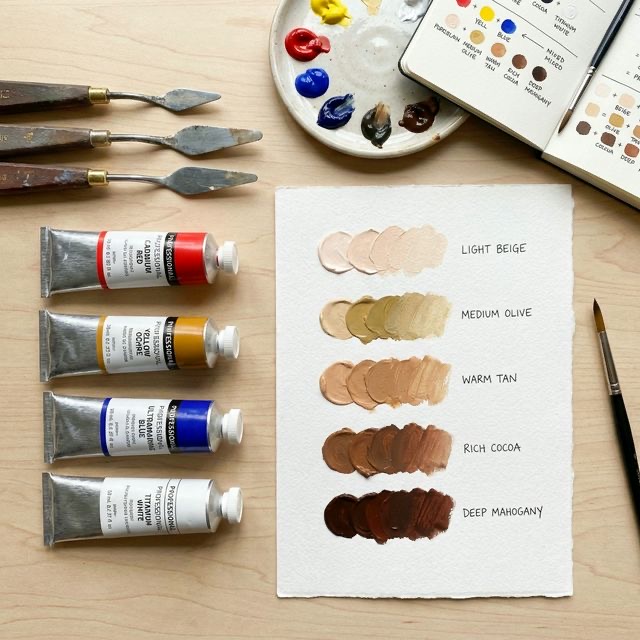
Creating Skin Tones: A Color Mixing Guide
- Author
-
-

- User
- C&C Admin
- Posts by this author
- Posts by this author
-
Painting a realistic human portrait is often considered the ultimate test of an artist's ability. Beyond capturing the correct proportions of the face, the hardest part of portraiture is undeniably mixing the perfect skin tone.
Many beginners try to take shortcuts by mixing white paint with orange, or worse, buying a tube of pre-mixed "flesh tint." These shortcuts almost always result in portraits that look chalky, plastic, or completely lifeless.
The truth is, human skin is incredibly complex. It is translucent, entirely unique to the individual, and constantly reflecting the colors around it. However, the foundational rules for mixing realistic skin tones are surprisingly simple. Regardless of whether you are painting deep mahogany or pale ivory, the formula is exactly the same. Let’s dive into the ultimate color mixing guide for creating realistic, beautiful skin tones.
1. The Big Secret: All Skin is Brown
Before you squeeze out a single drop of paint, you must understand one universal biological fact: All human skin tones are rooted in the color brown.
Biologically, the color of human skin is determined by melanin, which is a brown pigment. Whether someone has the darkest skin in the world or the lightest skin in the world, the underlying base color is exactly the same varying level of brown.
Why is this important?
Because the formula for mixing brown is simple: Red + Yellow + Blue. This means that every single skin tone on earth contains all three primary colors. If you ever mix a skin tone and it looks like flat, plastic orange, it is almost certainly because you forgot to add the third primary color (blue) to neutralize it.
2. Step One: Mixing the Base
Never start a portrait by mixing a light skin tone. Start by mixing a medium, rich brown base. From this anchor point, you can steer the color lighter, darker, warmer, or cooler.
The Foolproof Base Formula
- Mix equal parts Yellow and Red to create a bright, fiery orange.
- Add a very small drop of Blue to neutralize the orange.
- Mix thoroughly. You should now have a rich, warm, medium brown.
This brown puddle is your starting line. Do not worry if it doesn't match your subject yet; we are about to adjust it.
3. Step Two: Adjusting the Undertone
Every person has a unique undertone to their skin. The undertone is the subtle color that shines through from beneath the surface of the skin. Correctly identifying and matching the undertone is what makes a portrait look alive.
There are three main categories of undertones: Warm, Cool, and Neutral.
Warm Undertones (Peachy, Golden, Yellow)
If your subject has warm undertones, their skin will have a subtle golden or peachy glow. (People with warm undertones usually look best in gold jewelry). * How to mix it: Take your base brown puddle and add a tiny touch more Yellow. If the skin leans toward peach, add a microscopic drop of Red. Be very careful not to make the mixture look like bright orange plastic.
Cool Undertones (Pink, Red, Blue)
If your subject has cool undertones, their skin will have subtle pinkish or bluish hues. (People with cool undertones usually look best in silver jewelry). * How to mix it: Take your base brown puddle and add a tiny touch more Red and Blue. The red provides the rosy flush, while the blue keeps the mixture cool and shadows deep.
Neutral/Olive Undertones (Green, Grey)
If your subject has olive undertones, their skin will have a subtle greenish or ashy hue. * How to mix it: Take your base brown puddle and add a tiny touch more Blue and Yellow (which makes green). Believe it or not, an olive skin tone is basically a very warm, desaturated brown-green!
4. Step Three: Adjusting the Value (Light and Dark)
Once you have established the correct undertone, the final step is adjusting the "value," which simply means making the skin tone lighter or darker.
Mixing Deep, Dark Skin Tones
To make your base tone darker, never add black paint. Black paint is completely flat and will instantly kill the vibrancy and life of the skin tone, making it look muddy and ashy. * The Fix: To darken the skin tone, add more of your darker primary colors: Blue and Red. If the mixture gets too purple (because blue + red = purple), add a tiny drop of Yellow to pull it back to brown. * Another option: Use a dark, rich, transparent color like Burnt Umber or Alizarin Crimson to deepen the shadows naturally.
Mixing Light, Pale Skin Tones
To make your base tone lighter, you must use White paint. However, you must be incredibly careful. Titanium White is heavily opaque and very cool. If you add too much white to your brown base, the skin will instantly look chalky and ghostly. * The Fix: Whenever you add white to lighten a skin tone, you must also add a tiny speck of Yellow or Red to replace the warmth that the white paint destroyed. * The Pro Tip: Instead of pure white, try mixing a tiny bit of Yellow into your white before you add it to the brown base. This creates a warm, buttery lightening agent that will not turn your skin tones chalky.
Conclusion
Mixing realistic skin tones requires patience, practice, and a foundational understanding of the color wheel. By remembering that all skin is simply a variation of brown (Red + Yellow + Blue), and by adjusting the undertones and values incrementally, you can say goodbye to flat, plastic-looking portraits forever.
The next time you sit down to paint a face, put away the pre-mixed "flesh" tubes. Squeeze out your primaries, mix your anchor brown, and bring your portrait to life from scratch!